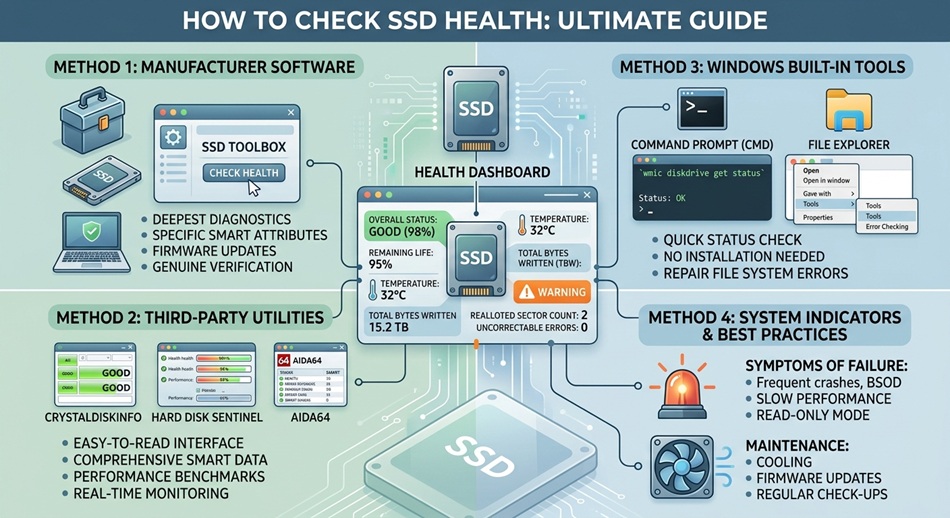
To check SSD health on Windows, open Command Prompt as administrator and run “wmic diskdrive get status”: a result of “OK” means no issues detected. On a Mac, open Disk Utility, select your SSD, and click First Aid to scan for errors. For a more detailed read on actual wear and lifespan, a dedicated tool like CrystalDiskInfo (Windows) gives you the full SMART data behind that simple status.
SSDs don’t fail the way old spinning hard drives did, with warning clicks and grinding noises. They tend to just quietly wear down, which is exactly why checking health proactively matters more than it used to; by the time you notice a problem, you may have already lost data. If your Mac feels slow and you’re not sure whether it’s storage or memory, it’s worth checking both; clearing RAM is the faster thing to rule out first.
Windows: quick check via Command Prompt
- Search for Command Prompt, right-click it, and choose Run as administrator.
- Type
wmic diskdrive get statusand press Enter. - A result of OK means no issues are currently detected. Anything else warrants a closer look with a dedicated tool.
You can also right-click your SSD under This PC, select Properties > Tools, and run Check under Error Checking for a basic file-system-level scan.
Windows: the native Settings app method
On Windows 11 specifically, go to Settings > System > Storage > Disks & volumes, select your SSD, and check its properties panel for basic health status, no Command Prompt required. It’s less detailed than SMART data but doesn’t need admin permissions or typing a command.
Windows: PowerShell for a more modern alternative
PowerShell offers a more current equivalent to the wmic command above: open PowerShell as administrator and run Get-PhysicalDisk | Select FriendlyName, HealthStatus, which reports health status per drive in a cleaner format.
Checking from BIOS/UEFI, outside Windows entirely
Most modern motherboards show basic SMART status directly in the BIOS/UEFI setup screen, accessible before Windows even loads (usually by pressing Delete or F2 during boot, depending on your motherboard). This is useful specifically if Windows won’t boot and you need to check drive health before troubleshooting further.
macOS: Disk Utility and System Report
- Open Applications > Utilities > Disk Utility.
- Select your SSD from the sidebar.
- Click First Aid and let it scan for errors.
For basic drive type and status information, go to Apple menu > About This Mac > System Report > Storage.
For a genuinely detailed read: SMART monitoring tools
Most SSDs support SMART (Self-Monitoring, Analysis, and Reporting Technology), which tracks detailed wear metrics that a simple OK/not-OK status doesn’t show you. Dedicated tools give you real numbers instead of a pass/fail summary:
- CrystalDiskInfo (Windows): the most widely used free SMART reader, showing detailed health percentage and specific warning flags.
- smartmontools (Linux/macOS): a command-line SMART tool that works across platforms for users comfortable with terminal commands.
- Manufacturer tools: Samsung Magician, WD Dashboard, Kingston SSD Manager, and Crucial Storage Executive are brand-specific tools that often give the most accurate readings for their own drives, plus extras like firmware updates and performance benchmarking.
For a deeper check beyond basic SMART data, most of these tools also offer a surface scan, a slower, more thorough scan that actively checks for hidden bad sectors rather than just reading reported status. It’s worth running if SMART data looks borderline but you want more certainty before deciding whether to replace the drive.
What the numbers actually mean
SMART data reports things like total bytes written, reallocated sector count, and remaining lifespan as a percentage. A single reallocated sector isn’t necessarily alarming; a rapidly climbing count, or a health percentage dropping quickly over a short time, is the real warning sign worth acting on, meaning it’s time to back up important data and start planning a replacement.
Warning signs worth checking on, beyond a scheduled check-in
- Files that take unusually long to open or save, especially ones that used to be fast.
- Your system freezing briefly during disk-heavy tasks, like large file transfers or app launches.
- Boot times getting noticeably slower over weeks, not just a one-off slow start.
- Files that become corrupted or won’t open without an obvious cause like a bad shutdown.
Any of these on their own could be something else entirely, but seeing more than one together is a good reason to run a proper SMART check sooner rather than waiting for your next scheduled one.
If health comes back poor: what to actually do
Back up everything important immediately, don’t wait for a convenient time. Then, rather than manually reinstalling everything on a new drive, most manufacturer tools include a disk cloning feature that copies your entire drive, operating system included, directly onto a replacement, which saves considerable setup time over a fresh install.
Frequently asked questions
How often should I check my SSD’s health?
Checking every few months is reasonable for a drive under normal use. If you’re running the drive hard (heavy write workloads, older or budget SSD, drive nearing its rated write endurance) checking monthly is a more reasonable habit.
What SSD health percentage should worry me?
There’s no universal cutoff, but once health drops below roughly 80 to 90%, it’s worth backing up important data more actively and budgeting for a replacement, rather than waiting until it fails outright.
Can a failing SSD be repaired?
Generally no, not in the way a failing hard drive sometimes could be. SSD wear is largely a function of flash memory cell degradation, which isn’t something you can fix; the practical response is backing up data and replacing the drive.
Does checking SSD health with these tools slow down my computer?
No, reading SMART data is a lightweight background operation. Full diagnostic scans like Disk Utility’s First Aid can briefly use more resources, but a basic health check has no meaningful performance impact.