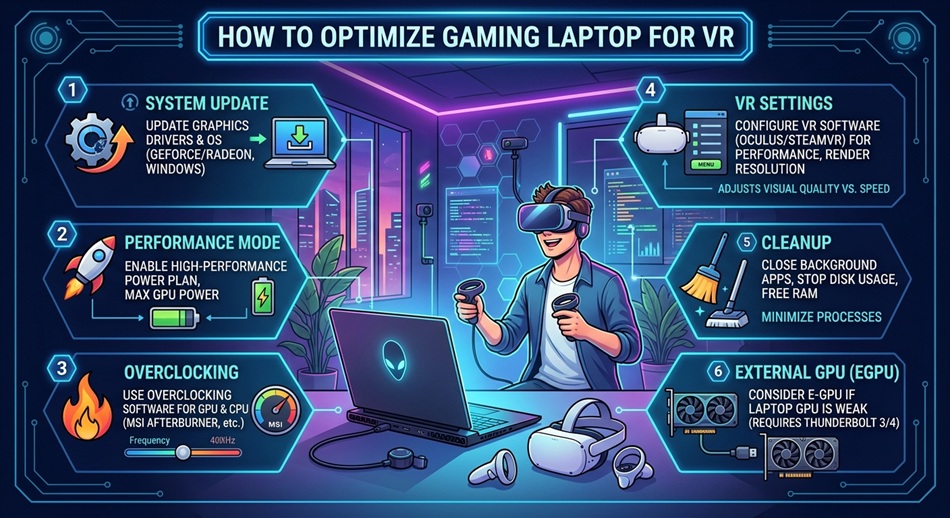
Quick answer: To optimize a gaming laptop for VR, plug it into AC power and set Windows to High Performance, force the dedicated GPU (not integrated graphics) in NVIDIA/AMD settings, set GPU power management to max performance, keep GPU temps under 83°C, use a wired 5GHz/6GHz connection or Link cable instead of Bluetooth, and set SteamVR render resolution to 100% before tweaking anything else.
If you’ve plugged a headset into a gaming laptop and watched the frame counter drop into the 60s while the fans scream, you already know laptops don’t run VR the way desktops do. It’s rarely a hardware problem. Usually it’s four or five settings fighting against you at once: a power plan still stuck in “battery saver” mode, a laptop quietly rendering on the integrated GPU, and a CPU throttling because it’s sitting on a bed instead of a hard desk.
I’ve set up VR on three different gaming laptops over the years, from a 2019 RTX 2070 machine to a current RTX 4070 mobile rig. The fixes below are the ones that actually changed frame times, not the ones that just sound like they should. Here’s the order I’d actually tackle them in.
What You Actually Need: Realistic Specs for Laptop VR
Before touching a single setting, confirm your laptop is even in the right weight class. VR is far less forgiving than flat-screen gaming: you need a sustained, near-constant frame rate, not an average.
| Headset | Minimum GPU (laptop) | Comfortable GPU (laptop) | VRAM | Refresh Rate | Connection |
|---|---|---|---|---|---|
| Meta Quest 2/3 (Link/Air Link) | RTX 3060 | RTX 4070/4080 | 6GB+ | 72-120Hz | USB-C cable or Wi-Fi 6/6E |
| Valve Index | RTX 3070 | RTX 4070+ | 8GB+ | 80-144Hz | DisplayPort 1.2 + USB 3.0 |
| HP Reverb G2 | RTX 3070 | RTX 4070+ | 8GB+ | 90Hz | DisplayPort 1.3 + USB 3.0 |
| Pico 4 / Pimax | RTX 3060 Ti | RTX 4070+ | 8GB+ | 90-120Hz | Wi-Fi 6 or DisplayPort |
Two things trip people up here. First, VRAM matters more than raw core count in newer VR titles. 6GB is genuinely tight now; 8GB or more is where you stop worrying about it. Second, check your laptop’s actual port layout: a lot of “gaming laptops” only expose USB-C for charging or display-only Thunderbolt, not a full DisplayPort Alt-Mode signal. That matters if you’re running an Index or Reverb G2 instead of a Quest.
Step 1: Fix Your GPU Drivers Before Anything Else
Outdated drivers are still the single most common cause of stutter and black-screen crashes in SteamVR, full stop. Don’t just click “update” and hope; do a clean install.
NVIDIA
- Open GeForce Experience or the standalone NVIDIA App and run a clean install of the latest Game Ready driver, not an update-over-update.
- Open NVIDIA Control Panel → Manage 3D Settings → Program Settings tab → add your VR game and SteamVR/Oculus executables individually.
- Set Power Management Mode to “Prefer Maximum Performance” for those specific programs (leave it on Normal globally: forcing it everywhere just wastes battery and heat on non-gaming tasks).
- Set Virtual Reality – Variable Rate Super Sampling to “Application controlled” and Virtual Reality pre-rendered frames to 1. This cuts input latency, which matters more in VR than in flat gaming.
AMD
- In Adrenalin, go to Gaming → Graphics and set Radeon Anti-Lag on for your VR titles.
- Under Performance → Tuning, confirm the dGPU is set to its full power limit, not a battery-conserving profile.
- Disable Radeon Chill and FreeSync for VR sessions. Both were built for flat-panel gaming, and both can introduce frame pacing issues with a headset’s fixed refresh rate.
Step 2: Stop Windows From Sandbagging You
This is the fix with the biggest return for the least effort, and it’s the one people skip because it feels too simple to matter.
- Plug into AC power. Every laptop I’ve tested drops GPU clocks and CPU boost the moment it’s on battery, VR or not. This alone can cost you 20-30% of your headroom.
- Go to Settings → System → Power & Battery → Power Mode and set it to Best Performance (or open the classic Control Panel power plans and select/create a High Performance plan if your laptop still exposes it).
- Open your manufacturer’s control app (Armoury Crate, Omen Gaming Hub, Legion Toolkit, MSI Center, Predator Sense) and switch the system profile to Performance/Turbo, not Balanced. This is a separate layer from Windows’ power plan, and it often overrides it.
- Turn off Adaptive Brightness and any battery-saver auto-triggers in Settings so the system doesn’t quietly downshift mid-session when the battery dips below whatever threshold it’s watching.
Step 3: Make Sure the Dedicated GPU Is Actually Rendering
Laptops with NVIDIA Optimus or AMD’s equivalent hybrid graphics will happily run SteamVR on the integrated GPU if nothing tells it otherwise, and the result looks like a corrupted mess of dropped frames because the iGPU physically cannot keep up.
- Right-click the desktop → NVIDIA Control Panel → Manage 3D Settings → Program Settings, and manually set SteamVR.exe, vrmonitor.exe, OVRServer_x64.exe (Oculus), and your VR game’s .exe to “High-performance NVIDIA processor.”
- If your laptop supports it, enable Advanced Optimus or a dGPU-only/MUX-switch mode in the manufacturer app. This routes the display output straight through the dedicated GPU instead of passing through the iGPU, which reduces latency and is worth the reboot it usually requires.
- Confirm it worked: open Task Manager’s Performance tab during a VR session and check that GPU 1 (your dGPU) shows load, not GPU 0.
Step 4: Close What’s Stealing Your Frametime
VR headroom is thinner than flat-screen headroom, so background apps that you’d never notice in a normal game become the difference between 90 FPS and reprojection kicking in.
- Close Chrome, Discord, cloud sync clients (OneDrive, Dropbox), and streaming apps entirely. Minimized isn’t closed.
- Disable the Xbox Game Bar overlay, GeForce Experience/NVIDIA overlay, and Discord’s in-game overlay. Overlays hook into the render pipeline and each one adds a small but real frametime cost that compounds in VR.
- Check Task Manager’s Startup tab and disable anything unnecessary launching at boot: antivirus scans, driver update checkers, RGB software you don’t need running live.
- If you’re on a laptop with 16GB RAM, close browser tabs aggressively. VR compositors and SteamVR itself eat a surprising amount of memory before the game even loads.
Step 5: Thermal Management (Where Laptops Actually Lose)
This is the real difference between a laptop and a desktop for VR, and no software setting fixes it. A laptop chassis has maybe a third of the cooling surface area of a desktop tower, and VR pins both CPU and GPU near 100% load simultaneously for the entire session. There’s no idle moment for heat to dissipate.
- Elevate the laptop. A $15 stand that lifts the chassis 1-2 inches off the desk noticeably improves intake airflow versus sitting flat on a surface, especially if the intake vents are on the bottom.
- Clean the vents. If your laptop is more than a year old and has never been opened, dust buildup on the heatsink fins is very likely costing you real thermal headroom. Compressed air through the exhaust vents helps; a full strip-down and repaste is the next step if temps still won’t budge.
- Use a cooling pad with real airflow, not a passive stand. Look for one with fans positioned under your laptop’s actual intake vents (check the underside before buying: some laptops intake from the sides, not the bottom).
- Monitor real numbers with HWiNFO64 or MSI Afterburner during a session. As a working guideline: sustained GPU temps under 80-83°C are healthy, 83-87°C is where you’ll start seeing minor clock reductions, and 90°C+ is where visible throttling and frame drops show up. CPU thresholds run a bit hotter. Many mobile CPUs are designed to run near 95-100°C briefly, but sustained readings there mean throttling is active, not just tolerated.
- Consider undervolting the CPU and GPU through Intel XTU, AMD’s Ryzen Master, or MSI Afterburner’s curve editor. This sounds counterintuitive, but a slightly lower voltage at the same clock speed generates meaningfully less heat, which often lets the chip sustain higher boost clocks for longer instead of throttling down every 90 seconds.
Step 6: Wireless Headsets (Kill the Interference First)
If you’re running Quest 2/3 over Air Link or Virtual Desktop instead of a cable, wireless interference is probably your actual bottleneck, not your GPU.
- Your laptop’s built-in Wi-Fi antenna sits inches from a GPU and VRM that are dumping heat and electrical noise, and internal antennas are generally weaker than a router-grade radio. A dedicated USB Wi-Fi 6E adapter plugged directly into a rear USB port often fixes stutter that no software setting will touch.
- Put your router (or a dedicated one just for VR) on the 5GHz or 6GHz band, never 2.4GHz. That band is saturated with Bluetooth traffic, smart home devices, and neighboring networks, and it can’t carry the bandwidth wireless VR needs anyway.
- Ethernet the laptop to the router if you’re using Virtual Desktop or Air Link over a home network, rather than relying on Wi-Fi at both ends of the connection.
- Turn off Bluetooth on the laptop when you’re not using Bluetooth controllers, and disable Bluetooth on nearby unrelated devices. Bluetooth and 2.4GHz Wi-Fi share spectrum and actively step on each other.
- Keep the headset within roughly 15-20 feet of the router or adapter with minimal walls in between; signal degrades fast with distance and drywall.
Step 7: Wired Headsets (Cables and Ports That Actually Matter)
For Quest Link, Index, or Reverb G2, the cable and port you use isn’t a minor detail. It’s a hard bandwidth ceiling.
- Use a certified USB-C 3.2 Gen 2 cable for Quest Link (Meta’s official Link cable or an equivalent-rated third-party one). Cheap charging cables often only carry USB 2.0 data speeds and will cap your resolution and cause visible compression artifacts.
- Plug directly into a laptop’s rear USB-A or USB-C port. Avoid USB hubs and front-panel extension docks, which add latency and can drop bandwidth below what the headset needs.
- For Index and Reverb G2, confirm your laptop’s USB-C port actually supports DisplayPort Alt Mode at full bandwidth. Some “USB-C” ports on laptops are power and data only; they won’t carry a video signal at all, which means those headsets simply won’t work through that port.
- If your laptop only has HDMI and no true DisplayPort output, check whether it’s DisplayPort 1.4 over USB-C via an adapter. A passive HDMI-to-DisplayPort adapter typically won’t work for headsets that require native DP signaling.
Step 8: Dial In SteamVR and Quest Link Render Settings
Once the hardware side is sorted, the software-side render settings are where you trade visual fidelity for frame rate, and this is genuinely the most impactful lever you have.
- In SteamVR, go to Settings → Video and set the Render Resolution slider to 100% (Auto) as a baseline, then adjust in 10% increments while watching the in-headset frame timing graph rather than guessing.
- In the Oculus/Meta PC app, go to Devices → Quest Link → Graphics Preferences and manually set Link resolution and refresh rate rather than leaving it on Automatic. Automatic tends to be conservative and doesn’t always reflect what your GPU can actually sustain.
- Enable Asynchronous Spacewarp (ASW) on Quest or motion smoothing in SteamVR as a safety net for dips, but treat it as a fallback, not a target: running at native frame rate always looks and feels better than reprojected frames.
- In-game, cut shadows, ambient occlusion, and anti-aliasing first. These cost the most frametime for the least visible payoff in VR, where headset resolution already blurs fine detail.
- Turn on DLSS or FSR if the title supports it. In VR-native titles like Half-Life: Alyx, this can recover 25-30% of frame rate with minimal visible quality loss, which is a bigger win than almost any other single setting.
Settings That Sound Good But Don’t Move the Needle
Worth being honest here: a lot of “optimization” lists pad themselves with tweaks that do nothing measurable.
- Windows Game Mode: inconsistent results in VR specifically; some users report micro-stutter with it on. Test both ways instead of assuming it helps.
- Disabling RGB lighting software: negligible, unless the software itself is poorly coded and eating CPU cycles by polling constantly. Check Task Manager before assuming it’s the fix.
- Registry tweaks for “gaming performance”: most of what circulates online predates current driver architecture and does nothing on modern Windows builds.
- Maxing out virtual memory or the page file: irrelevant if you already have 16GB or more of RAM and aren’t hitting swap in the first place.
What to Actually Expect From a Laptop GPU in VR
A mobile RTX 4070 is not a desktop RTX 4070. Laptop GPUs run at a fraction of the power draw of their desktop namesake (often 60-140 watts versus 200+ watts on desktop) because a laptop chassis simply can’t dissipate desktop-level heat. That translates to meaningfully lower sustained clocks, even after every optimization in this guide.
Practically, that means a laptop with a “4070-class” GPU performs closer to a desktop RTX 4060 Ti in sustained VR workloads, not a desktop 4070. That’s not a failure of your settings. It’s the physics of the chassis. Optimizing gets you to the laptop’s actual ceiling; it doesn’t raise the ceiling itself. If you’re consistently falling short of 90 FPS even after drivers, power settings, and thermals are all sorted, the honest fix is lowering render resolution or in-game settings further, not chasing one more tweak that promises to unlock hidden performance.
Frequently Asked Questions
Can any gaming laptop run VR?
Only if it has a discrete NVIDIA or AMD GPU that meets the headset’s minimum spec. Laptops with integrated graphics only, common in thin-and-light “gaming” laptops, cannot run PC VR at all.
Why does my VR headset stutter even with a good GPU?
Usually one of three things: the laptop is running on battery power, SteamVR is rendering through the integrated GPU instead of the dedicated one, or thermal throttling is kicking in after 10-15 minutes of sustained load.
Is 90 FPS necessary for VR, or can I run lower?
90Hz (or your headset’s native refresh rate) is the target because falling below it consistently causes visible judder and, for a lot of people, motion sickness. Occasional dips get masked by reprojection; frequent dips won’t.
Does a laptop’s Wi-Fi affect wired VR headsets?
No. Wired connections aren’t affected by Wi-Fi interference; that only matters for wireless setups like Quest Air Link or Virtual Desktop.
Should I undervolt my laptop for VR, and is it safe?
Undervolting is safe when done incrementally with proper testing. You’re reducing voltage while keeping the same clock speed, which lowers heat rather than pushing the chip harder. Test stability with a stress tool before trusting it in a long VR session.
Do I need a cooling pad, or is elevating the laptop enough?
Elevating helps intake airflow, but an active cooling pad with real fans under the intake vents provides a bigger, more consistent temperature drop, especially during 30+ minute sessions.
Why is my Quest Link cable capping my resolution?
Most likely it’s a USB 2.0-speed cable rather than a genuine USB-C 3.2 Gen 2 cable. Charging cables frequently look identical to data-rated ones but carry far less bandwidth.
How much VRAM do I actually need for VR in 2026?
8GB is the comfortable baseline for current titles; 6GB laptops will run lighter games fine but will hit ceilings in newer, texture-heavy VR titles.
Does closing background apps really make a measurable difference?
Yes, more than most people expect. VR’s frame budget is thinner than flat-screen gaming, so a browser or sync client stealing even a few percent of CPU or GPU time can be the difference between hitting 90 FPS and triggering reprojection.
Can I use an external GPU (eGPU) with a gaming laptop for better VR performance?
Yes, if your laptop has Thunderbolt support, but expect a real-world performance penalty of roughly 15-25% compared to that same GPU in a desktop, due to Thunderbolt’s bandwidth limits versus a native PCIe slot.