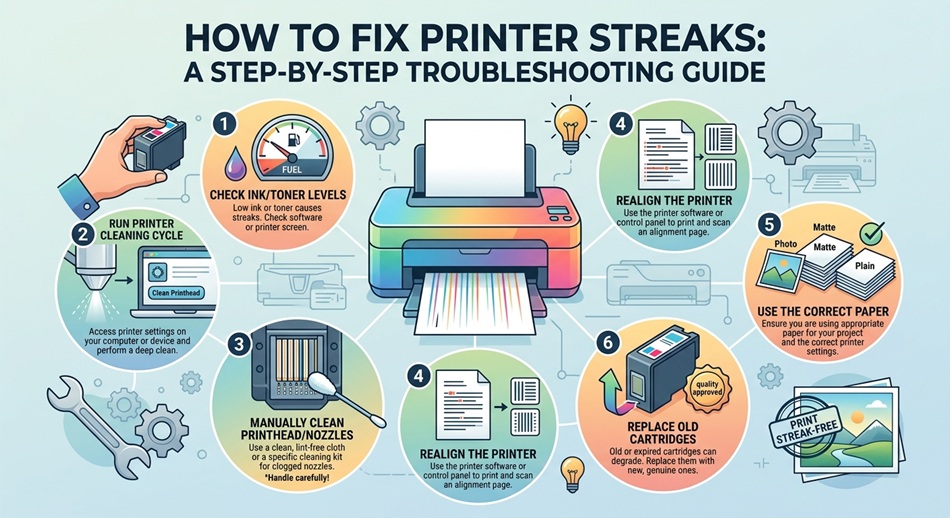
To fix printer streaks, run your printer’s built-in cleaning cycle first (usually found in its settings or maintenance menu), then check ink or toner levels since low ink is the single most common cause. If cleaning doesn’t fix it, the streak is usually coming from dust or residue on the internal rollers or, on laser printers, the drum.
Streaks are one of those printer problems that looks alarming (a whole line of missing or smeared print running down the page) but is almost never a sign you need a new printer. It’s nearly always one of a handful of specific, fixable causes.
Step 1: Run the built-in cleaning cycle
Almost every printer has a cleaning cycle in its settings or maintenance menu. Run it, then print a test page. This alone resolves a large share of streaking issues, since it’s specifically designed to clear minor clogs or misalignment in the print head.
Step 2: Check ink or toner levels
When ink or toner runs low, the printer can’t coat the page evenly, which shows up as faded streaks or spotty patches rather than a clean, uniform print. Check levels through your printer’s app or on-device menu, and replace any cartridge that’s running low, even if it’s not fully empty yet.
Step 3: Clean the rollers
Paper dust and ink residue build up on the rollers that feed paper through the printer over time, and that buildup can cause uneven feeding that shows up as streaking. Turn the printer off and unplug it, then gently clean the visible rollers with a microfiber cloth lightly dampened with isopropyl alcohol. Never use water or spray cleaner directly inside the printer.
Step 4: Align the print head
Run the cartridge or print head alignment process through your printer’s settings menu. Misalignment doesn’t just cause blurry text; it can cause streaking too, since the print head isn’t laying ink down exactly where it should.
For laser printers specifically: clean the drum and corona wire
Laser printers streak for a different reason than inkjets: dust or toner buildup on the imaging drum or corona wire. Most laser printers have a dedicated cleaning mode in settings, and it’s worth running before assuming a part needs replacing.
Clean the cartridge contacts
The metal contact points where the cartridge meets the printer can accumulate a thin film of dust or dried ink over time, which interferes with the electrical connection and can cause streaking that looks like a clogged nozzle but isn’t. Remove the cartridge and gently wipe the gold or copper contacts with a dry, lint-free cloth, no liquid needed here.
Check your print quality settings
A printer set to Draft or Economy mode intentionally uses less ink, which can look like streaking or faded print, especially on photos or dense graphics, without anything actually being wrong with the printer. Switch to Normal or Best quality in your print settings before troubleshooting further, and use a photo-specific mode when printing images.
Still streaking after all of that?
Power cycle the printer completely: turn it off, unplug it, wait 30 seconds, then plug it back in. This resets minor internal glitches that cleaning cycles don’t touch. If streaking persists after cleaning, checking ink, cleaning rollers, and a power cycle, the cartridge itself, or the drum on a laser printer, is likely damaged or worn out and needs replacing.
How to tell what kind of streak you’re actually dealing with
- A consistent vertical line in the same spot on every page: almost always a clogged nozzle or a scratch on the drum, points to a specific, localized cause rather than a general ink issue.
- Faded or inconsistent streaking that varies page to page: more likely low ink or toner, or a feeding issue from dust buildup, since it’s not tied to one fixed location on the page.
- Horizontal banding rather than vertical streaks: usually a print head alignment problem specifically, and running the alignment tool is the first thing to try.
Preventing streaks from coming back
Print something at least every week or two, even a test page, since ink and toner can dry out or settle unevenly during long stretches of disuse, which is a common cause of streaking right after a printer’s been sitting idle. Keeping the printer in a reasonably dust-free area also meaningfully reduces how often roller and drum buildup becomes a problem in the first place.
Frequently asked questions
Why does my printer only streak on one side of the page?
This usually points to a dirty or worn roller on that specific side, or a partially clogged nozzle on that side of the print head. Clean the rollers first, then run a nozzle-check pattern if your printer supports one to isolate which nozzles are affected.
Can low-quality paper cause streaking?
Yes. Paper with excess dust or an uneven surface can cause feeding issues and ink absorption problems that look like streaking but have nothing to do with the printer itself. Try a different, better-quality paper before assuming the printer is at fault.
Is it worth replacing ink cartridges with third-party ones to fix streaking?
Third-party cartridges can work fine, but inconsistent quality is a real risk, and a poorly manufactured cartridge is a common source of streaking that a genuine cartridge wouldn’t cause. If streaking started right after switching cartridge brands, that’s the first thing to suspect.
How often should I run my printer’s cleaning cycle?
Only when you actually notice a problem, like streaking or faded print. Running it too frequently as routine maintenance uses up extra ink or toner without a real benefit if the printer wasn’t having an issue in the first place.